When I opened the box of my Roomba back in 2016 there was a sticker saying:
This robot contains an electronic and software interface that allows you to control or modify, and remotely monitor its sensors. For software programmers interested in giving your iRobot new functionality we encourage you to do so.
A little later I first started playing with microcontrollers sending infrared commands to the IR sensor in order to start cleaning via my home network (or specifically by pressing one of the Amazon Dash buttons that came out at that time).
While newer generations of the Roomba product line already come with wifi and cameras I always wanted to be able to add that myself.
Although it may sound a little over-engineered here’s my current project:
Under the top cover of the Roomba there’s a serial interface connector hidden. Using a documented serial interface you can easily send either higher-level commands like start cleaning, stopping, and seeking the dock, or low-level commands like reading individual sensor values, controlling the motors or even playing notes on the internal speaker.
Using an ESP32 microcontroller I was able to “bridge” the serial interface to MQTT and an HTTP api. Instead of implementing everything from scratch I used the Tasmota firmware. Tasmota is a great open-source firmware for ESP8266 and ESP32 microcontrollers that helped me doing getting started without any custom code on the microcontroller.
I used an ESP32-cam board (later more on the “cam” part). This board is cheaply available. Make sure you also get the dev-board since the ESP32-cam board itself doesn’t come with a USB connector and you’d end up fiddling around with additional components. The ESP32 runs on 3.3V (and most boards have a built-in voltage regulator for 5V, which is the USB voltage). But the Roomba connector only includes an unregulated output that can range from 15 to 17V. So we need to drop that voltage safely. While some people suggest using a cheap USB car carger this didn’t work for me so I ordered some MP1584EN buck converters. Roomba’s RX pin works fine the the ESP32 3.3V output, but the data returned from Roomba’s TX been needed an extra PNP transistor (I used an 2N3906) so that the signal was readable reliably. Since I also wanted to capture a video feed I replaced the OV2640 cam with a different fisheye lens with a longer cable. This is what my prototype board looks like:


Getting the camera up and running with Tasmota required some extra steps. Carlos Gomes wrote an excellent article with step-by-step instructions. With the new firmware in place you get the video-feed embedded into the Tasmota web interface.
Controlling the Roomba can be done easily via serial commands and those commands can be send via Tasmota out of the box. Here are some examples of the basic operations:
# Start:
Backlog SerialSend6 128; Delay 0.1; SerialSend6 131; Delay 0.1; SerialSend6 135;

# Seek Dock:
Backlog SerialSend6 128; Delay 0.1; SerialSend6 131; Delay 0.1; SerialSend6 143;

# Stop
Backlog SerialSend6 128; Delay 0.1; SerialSend6 131; Delay 0.1; SerialSend6 141;

# Drive in reverse at a velocity of -200 mm/s while turning at a radius of 500mm (byte sequence: [137] [255] [56] [1] [244]=
Backlog SerialSend6 128; Delay 0.1; SerialSend6 131; Delay 0.1; SerialSend6 137; Delay 0.1; SerialSend6 255; Delay 0.1; SerialSend6 56; Delay 0.1; SerialSend6 1; Delay 0.1; SerialSend6 244;
The Tasmota firmware running on ESP32s allows you to write simple scripts using the Berry scripting language. Based on Leon Wright’s post and code I built a “Roomba driver” for Tasmota that allows controlling the roomba with a little on-screen joystick:

Additionally I also added new commands to the Tasmota API that can easily be accessed via MQTT or HTTP:
From here I was able to control the Roomba via the Tasmota web interface and programmatically via MQTT and HTTP. But my goal was to allow the Roomba to become a little smarter. Since the ESP32 microcontroller isn’t very powerful I wrote some scripts that look at the video stream and control the Roomba via the API. The delay of the camera stream and the slow responsiveness of the API make things harder, but it works. A more powerful single board computer (maybe an Nvidia Jetson Nano…) would probably have been a better choice.
Using OpenCV I had the Roomba look for ArUco markers. ArUco markers allow OpenCV to estimate the pose of the marker. Using some filtering the jittering can be smoothed out a little bit. Now the goal was to have the Roomba position itself right in front of an ArUco marker at a right angle and at a given distance.
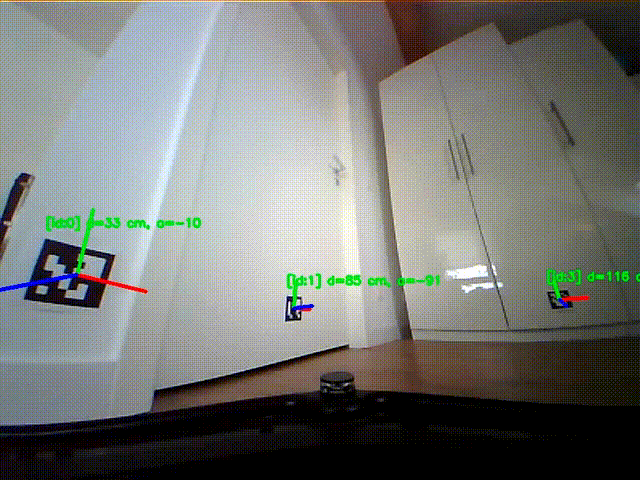
With this in place many applications are possible. With multiple ArUco markers sticking on the walls it could be possible to create a map of the room or to make Roomba navigate to given waypoints. Sticking an ArUco marker on the top of the Roomba and observing it with an external camera might be another fun experiment.